A beginner’s guide to grip training
This article is aimed at clearly addressing and explaining several different types of grip strength and ways of improving them.
Whatever your chosen sport or hobby, an increase in grip and general hand/wrist strength can be enough to give you the edge over others or to continually set new personal bests. Whether you are swinging a golf club, climbing a rockface, entering a grappling competition, training with kettlebells or just trying to close a certain strength handgripper, just a few weeks of working your grip specifically and with a balanced and progressive routine can yield good- to great -results for nearly every one of us. The training sessions don’t need to be long, just effective, quite challenging and above all- consistent! 10 minutes 2-3 times a week is more than enough to develop serious grip strength with several months of training.
Why is grip important?
Research has shown many times that one of the greatest indicators of independence in old age is grip strength as it is one of the last areas to weaken. People with a good grip have been shown to show greater independence in old age such as dressing themselves, being able to get in and out of the bath unaided, climbing stairs with no problems and many other activities. If you want to improve your overall health and longevity then grip training is certainly something to consider.
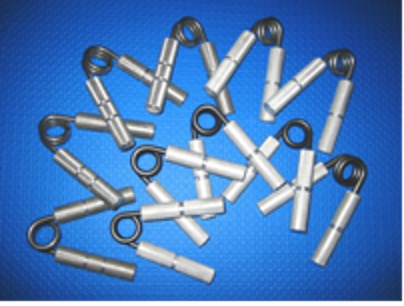
Crushing Grip:
Crushing grip refers to a squeezing action where the hand makes, or tries to make, a fist. Probably the best way to train this type of grip strength is with hand grippers- not any old hand grippers! But real, strong, metal grippers that are tough and take time and effort to close. There are many types of grippers to choose from: Captains of Crush grippers, Heavy Grips, Robert Baraban grippers, Beef Builder grippers etc. The good thing with different types of grippers is that some sets fall nicely into the places between the grippers of another set. This has the advantage of acting as a stepping stone to the next gripper in the collection you are trying to close.
Training Crush Grip:
There are several ways of using hand grips to improve your crushing grip. Included here is information on terms you may come across to help you progress with your crush grip training:
1. Cheat/forced close-squeezing the gripper as far as you can with one hand then using the other hand or a push against the hip to finish the close
2. Close- when the handles of the gripper touch or the last part of the squeeze action-after the sweep
3. Dogleg-the part of the spring leg which is straight compared to the other
4. Filed gripper-filing down the inside of one of the legs of a gripper. The purpose of this is to increase the range of motion and therefore the difficulty on a gripper you know you can already close
5. Grind-when closed, rotating the hand to cause the handles to scrape or grind against each other
6. Hold-when the handles touch, keeping them together for any length of time
7. Inverted rep/close-closing a gripper with the spring facing downwards
8. Negative-using a cheat close then trying to stop the gripper from opening or allowing it to open as slowly as possible
9. No-set close-using only one hand to set and close a gripper without assistance
10. Overcrush-when then handles touch, continuing the squeeze as hard as you can
11. Setting-using the other hand to position the gripper and often to assist in the initial part of the close. the hand must then be removed for any certification attempt and be more than 12 inches from the closing hand on the last 1 inch of the close attempt
12. Strap hold-placing a weighted strap between the ends of the handles and using an overcrush to keep the strap between the handles for as long as possible or for a set time until the weight falls
13. Sweep-the first part of the range of motion of a gripper. this is the larger action which takes the handles from the start position up to a nearly closed position
14. Timed hold-holding a gripper shut for a timed duration
Pinch Grip:
Pinch grip is a squeezing action similar to that of a crab’s claw- the fingers and thumb move together to clamp on either side of an object before lifting. The most common types of pinch grip training are plate pinching and block weight lifting.
Training Pinch Grip:
1. Plate Pinching-a good test of pinch strength is to see how you rate against some Olympic plates. Place the plates upright and together (smooth sides out) and pinch on to them from the top, then squeeze and try to lift them. Try 2 x 20lb plates then work up. The pinch can be trained close grip (2 plates) or wide (several small, lighter plates-usually 10lb). Passing plates you can lift from hand to hand is a very good workout and requires good pinch grip endurance. The aim of many people who train their pinch with plates is to lift the infamous 2 x 45lb plates!
2. Block weights-the most common types of block weight are usually the ends of cast dumbbells believe it or not! The bar is removed leaving 2 block weights and a small bar that looks nice. Block weights are a superb way to train the hands as they can be lifted from the face (wide side) or top (thinner side) and also thrown about. You can spin and catch them, throw them hand to hand, drop and pick them out of the air and so on. With heavier block weights the only way to really lift them from the floor is with the pinch action, or a claw action of you lift from the face of the block. The heavier the block the wider it is so the pinch gets worked at different angles. Block weights are also referred to as “blobs” and “the blob” is ½ of a 100lb cast dumbbell, or a 50lb block weight. Lifting this weight from the floor is the aim of most people who train with heavy block weights. For an adjustable block weight a pinch block can be attached to a loading pin and loaded with weights for a similar style of training.
Thick Bar Grip:
Thick bar refers to training 1 arm (dumbbell) or 2 arm (barbell) lifts where the thickness of the handle is much wider than normal-usually 1 inch. The bar diameters can be anything from 1.5 - 4 inches and sometimes even more.
Thick Bar Training:
Thick bar training can easily be implemented on standard training equipment by using a sleeve to place over the handle of a normal dumbbell bar. Another adjustable thick bar tool is the Rolling Thunder by Ironmind, which is a revolving 2.5 inch handle that attaches to a loading pin. One of the most famous thick bar training tools is the Thomas Inch dumbbell. It weighs 172 pound (nearly 12 stone) and has a handle thickness of 2 3/8 of an inch or about 60mm. The thickness of the handle is what stops it ever leaving the floor for most people. Many people that train thick bar regularly have the Inch dumbbell as their desired lift. Recently, a new monster has emerged-the Millennium Dumbbell (228lb). This beast has the same stats as the Thomas Inch dumbbell, but weighs 25kg more and so far has only fully left the floor for a handful of people!
Leverage:
Leverage refers to the use of training tools where the weight is displaced to one end-like a sledgehammer-rather than balanced like a standard barbell or dumbbell. Leverage mainly works the wrists but is also a great way of training the grip as an incredible level of crushing power is needed to counteract the torsion produced by the displaced weight.
Leverage Training:
Probably the most common form of leverage training is the sledgehammer or steel/wooden club. These training items can be used in such a way that a very high level of tension is placed on the grip and wrists just to maintain control of them. They can be held as far from the weighted end as possible and either rotated side to side in front of the body or held out at arms length to the front and side of the body and lowered towards the nose-a true test of wrist strength and grip confidence!
Active recovery:
Active recovery is an often overlooked part of grip training and can be a real bonus to your gains. The idea is to train lightly so you still maintain what you have developed but not to the extent where fatigue sets in or injury risk is a possibility. Some really great training tools have been developed specifically for active recovery and intense grip training alike-depending how you use them: the Snowball and the gyro Roller Ball.
1. The Snowball can be used to work the various muscles of the hands in a soothing way after grip workouts or as part of an active recovery programme on your days off. It can also be used with force for working various aspects of grip (the crush, pinch, finger training, thumb training etc.) as well as for warming up the hands or cooling down after a grip training session
2. The Roller Ball is a gyroscope that rotates with slight wrist movements and can reach speeds of over 8000 revolutions per minute. Similar to the snowball, it can also be used for active recovery at low revs or intense training at higher revs. Roller balls have the advantage of keeping the hand muscles under varying tension depending on the speed of the gyroscope while keeping the wrist continuously moving. Because of this combination, at lower speeds these devices can provide soothing rehabilitation to Carpal Tunnel Syndrome, Repetitive Strain Injury and Arthritis.
Grip Training- where do I start?
The best idea would be to ask yourself what you actually want before you decide what to do-unless your aim is just general grip strength. If you want to shut a certain gripper, base most of your grip training around the grippers, if you want to pinch heavy plates, base a lot of training on plate pinching and block weightlifting and so forth. Start off with some basic equipment:
1. 2-3 grippers
2. Block weight
3. Sledgehammer or club-a dumbbell loaded one end only can also do the same job!
4. Some active recovery equipment
5. Chalk
This is just a basic example for someone who is serious about improving their grip-if you want less get less, if you want more, get more. These items will allow you to train your grip from several angles and allow for good, general grip progress if used properly and consistently. If you already follow a training programme then finish the routine with 5-10 minutes of grip work. If your training is mainly with free weights, then place the grip session at the end of your normal routine as fatigued or even moderately trained grip will have a negative effect on your lifting. If you are worried about your grip training always being less than your best as it is only trained after a good workout then test your personal bests on the grip items you use before your workout, then after your weight training hit the full grip routine. An alternative would be to train your grip on alternate days to your other forms of training or at different times in the day-weights in the morning and grip in the evening- when reasonably fresh again.